
Frequently Asked Questions
How does File Synchronization work?
File Synchronization is based on modification dates, that is, it checks to see which files have a more recent modification dates and it replaces the copy with the older modification dates. Now, when you have an "orphaned" file which is a file that is in one of the synchronized folder but not the other, a decision has to be made so that the 2 folders stay in sync. By default, this file will be copied to the other synchronized folder. However, there is a problem with this: if you delete a file, you are creating an orphaned file in the other synchronized folder. If you keep the settings to the default, the next time you do a sync, File Synchronization will copy back the orphaned file which means in a sense that you cannot delete an item from one of the synchronized folder. So, that's why you have the "Delete orphaned files". With this option on, each time you delete a file in a synchronized folder, the other copy in the other synchronized folder will also be deleted. That now takes care of files you delete but that creates another problem: what if you create a new file? You don't want it to be deleted right away at the next sync! So, you have the "Keep recently modified files" option. When that option is turned on, when File Synchronization finds an "orphaned file", before it deletes it, it will compare its last modification time with the last synchronization time. If the last modification time of the file is more recent than the last synchronization time, File Synchronization will assume this file was newly created and will then copy it to the other synchronized folder instead of deleting it. That seems to cover most of the situations except one: if you move or rename files. When you move or rename a file, you're not really modifying it so its modification time doesn't change. So, when File Synchronization finds this orphaned file and checks its modification time, it is most likely not more recent than the last synchronization time. According to the same rules described above, File Synchronization will then delete the file. So far, without resorting to a database which would occupy a significant amount of space on your hard disk not considering how much slower this would make the application performs, we haven't found any workaround to this situation. The only workaround is to change the default bi-directional sync to a uni-directional sync. A uni-directional sync is actually the preferred mode when you want to backup a folder, that is, changes are only happening in a specific folder and you want to keep a backup folder exactly as this "master" folder. In a uni-directional sync, File Synchronization has a much easier to manage situation: it only has to maintain the backup folder an exact copy of the master folder. So, it doesn't matter if a file is new or old, when a file is in the "master" folder but not in the "backup" folder, File Synchronization will just copy it. If you turn on "Delete orphaned files", then each time File Synchronization finds an orphaned file in the "backup" folder, it will delete it so that the backup folder is always a perfect duplicate of the master folder.
That's how File Synchronization works. You won't find any other tool in the same price range running at the same speed that can handle all the situations that can happen in a bi-directional sync. There are even some tools on the App Store that won't even give you the choice of a bi-directional sync.
We tried hard to see what we could do about this limitation in the bi-directional sync but didn't find any acceptable compromise. The best way to deal with this is, again, to use uni-directional sync. You can even create 2 pairs with the same folders to synchronize. One pair synchronizes in one direction while the other pair synchronizes in the other direction. When you have done some work in one of the folder, you sync the pair with the folder that has the most recent changes to the other folder. You can then work in the other folder. When you're done working in the other folder, you sync the other pair that sync in the opposite direction. Of course, if 2 people works simultaneously in the 2 folders, that won't work. We actually don't recommend modifying 2 folders that are synchronized simultaneously. The reason being that if 2 users modify the same file at the same time, one of the user is going to lose his changes because File Synchronization doesn't synchronize the contents of files, it replaces one file with the most recent copy. You will actually have an error when File Synchronization finds that 2 copies of the same file have been both modified since the last synchronization.
Back to top
How do I setup File Synchronization?
Basically, you decide what you want to do first. What's the purpose of the operation? A bi-directional synchronization or a uni-directional backup?
Then, you have to decide what to synchronize/backup. The temptation is always good to backup everything. But, is it really necessary? It might be easy to setup but, in the long run, you're going to spend much more time to do each synchronization/backup then you would normally have to do for folders and files you might not have to recover in case of a loss. Many people will decide to synchronize their whole home folder. Bad idea! The Library folder in your home folder (that is now hidden starting in Lion) contains a lot of temporary files that are completely useless if you had to recreate your account. The synchronization/backup tools will take forever sorting those files out to find which ones to copy, not mentioning the significant amount of space it will take to back them up. Plus, they are completely useless for anything. Copying them to another system where you have an account won't help in a bit. Restoring them to a new account won't help either. You end up wasting a lot of time and resources for something that is simply useless.
The best approach is to ask you this question: which of those files in my account do I absolutely need, that I would die for if I was losing them? Once you identified those valuable files, you can create a folder in your Documents folder and you will label "Backup". You can create subfolders in Backup as you like but remember that only essential files should go in Backup. Once you decided, you need to create a folder on the disk or volume that is going to contain the copy of that folder. You then have to create a pair in File Synchronization to synchronize or backup those 2 folders. Click the "+" arrow in the toolbar of the main window to create a new pair. A new item will appear in the list under the toolbar and the inspector window will open with additional settings. First, you have to choose which folders to synchronize or backup. To select a folder on the left side (or what we call the source), click the button with a big question mark (?) on it that is left of the button with the double-arrow button. When you click on it, an open dialog will appear. Navigate your disk to retrieve the Backup folder you created in the Finder in the Documents folder. Click "Open" to select that folder. Then, click the other button with the question mark (?) on the right. Repeat the same process but selecting the folder that is going to be synchronized or backed with it. If you need to access a remote volume and have to authenticate, make sure that you turn on the "Save my password" in the authentication dialog. This will help File Synchronization automatically mount that volume in the future.
Second, you have to setup the synchronization or backup operation. If the files you're copying to the other folder might be modified, then it's best to do a synchronization so that you can get those modified files back into your Backup folder. By default, the synchronization priority for a new pair is bi-directional, as represented by the big button with a double-arrow on it. So, leave it as it is. If, on the other hand, you really want to do a backup, then you need to change the synchronization priority from bi-directional to uni-directional. To do so, simply click once on the button itself. Its picture should change from a double-arrow to a single arrow pointing from the left to the right. If you selected the folder to backup on the left, then that's the synchronization priority you need so you can leave it like this. If, on the other hand, you need to set the priority from the folder on the right to the folder on the left, then just click once more on the button. The right pointing arrow should be replaced by a left pointing arrow, indicating that the content of the folder on the right will be replicated to the folder on the left.
Of course, some of your files might reside in specific location in your home folder and you cannot move them easily, like songs that are part of your iTunes library. It's OK to create a pair of folders to backup this folder (iTunes in the Music folder). Same for any other specific files you want to synchronize/backup, like movies or your iPhoto library.
Once you selected your pair of folders, you can turn on some additional settings. If you do a backup, you definitely want to turn on the "Delete orphaned files". An orphaned files is a file that resides in one of the folder you synchronize but not in the other, it is then orphaned. There are 2 main reason why you might make a file an orphaned: you created a new file in one of the folder or you deleted an existing file from one of the folder you synchronize. When doing a backup, you probably want to delete files from the backup folder as you are deleting them from the master folder. So, turn that checkbox on. If you're doing a sync, then things get a little more complicated. When doing a sync and finding an orphaned file, File Synchronization doesn't have any way to know whether that file was newly created or whether the other copy of the file in the other folder was deleted. So, in a sync, if you turn on "Delete orphaned files", all files that are orphaned will be deleted, so if you delete a file from one of the synchronized folder, the copy in the other folder will also be deleted. However, this might not be always what you want to do. If you create a new file in one of the folder, you probably don't want that file to be deleted right away! So, that's why we added another checkbox under "Delete orphaned files" that is labeled "Keep recently modified files". When you also turn on that checkbox, File Synchronization will perform an additional step before deleting an orphaned file. It will check the last modification date of the orphaned file. If the last modification date of the orphaned file is more recent than the last synchronization, then it will assume that the file was newly created and instead of deleting it, it will copy it to the other folder that is missing it. So, in the sync, with both these settings turned on, you are covered for most situations of creating new files and deleting old files. However, this won't work for moved files. If you move files around, those files will be deleted if you have "Delete orphaned files". When you move a file from one folder to another, you don't modify the file. So, File Synchronization has no way to know that this file has just been moved. If you move files as part of your operations, you might want to use a uni-directional backup instead of a synchronization. In a uni-directional backup, File Synchronization will always insure that the backup folder is always a perfect copy of the master folder.
The next thing to decide is the type of sync/backup you want. In automatic mode, as soon as a file is modified in one of the synchronized folder, the synchronization will start shortly after. However, if you modify a lot of files, this might not be the best mode as File Synchronization might end up synchronizing your folders continually. In the case of many files modified in a quick sequence, you might instead to choose the "Repeated" mode. In this mode, you setup in the main preferences the interval of the repeated sync and when this interval is reached, the sync/backup is performed. If you prefer to control when the sync/backup is performed, then leave the mode in Manual. The sync/backup will be performed only when you launch it yourself by clicking the "Preview" or "Synchronize" buttons in the toolbar.
Note that you can select multiple pairs at once to perform the synchronization. Just click on each pair in the list that you want to synchronize, while holding the "Command" key on your keyboard.
Finally, you might want to perform a synchronization automatically when File Synchronization launches. You can turn this option on in the main preferences, under the Sync Settings tab. Note that only pairs that are in Automatic or Repeating mode will be synchronized at launch. You can also instructs File Synchronization to automatically quit after the sync at launch. By turning both options on, you can automate File Synchronization. You can also setup File Synchronization to launch at a specific time, using these settings. To do so, launch iCal, the calendar application on Mac OS X. Double-click on the day you want to have File Synchronization to launch. A new event window will appear. Set the time of the event when you want the sync to be performed. In the Alert section, click the popup that is showing "Message with Sound". In the popup menu that will appear, select "Open File". Right under this popup, you're going to see "iCal" being automatically selected. Click the 'iCal" popup and select "Other…" from the popup. An open dialog will appear. Navigate to your Applications folder and select File Synchronization. Click the "Select" button. Back to the event window, click the textfield that says "30" in "30 minutes before" and change it for something like 1 minute before. That's it. If you want, you can repeat this event so that it will be performed every day, week or month on a specific day or date. However, be very mindful of this powerful feature specially if you are performing a synchronization instead of a backup. In a synchronization, the changes can go both ways. If something gets wrong in one of the folder you synchronize, this could spread to the other folder. You could end up losing valuable files if you're not there to monitor the synchronization. In a backup situation, the master folder is never modified so it is safer to use this type of sync in an automatic mode. In any case, whenever you create a new pair of folders to synchronize, you should *ALWAYS* perform a preview before doing a full synchronization/backup. A preview does exactly what a synchronization/backup does. Except that it doesn't copy any file. It opens a window where it lists all the operations that will result from performing that sync/backup. It is always a good idea to perform a preview for a few times after creating a new pair, just to be sure that everything is happening properly and no unexpected situations that could lead to loss of data is not present.
Back to top
How can I schedule automatic backups with File Synchronization?
We never added any scheduling functionality in File Synchronization because everything needed
is in Calendar. Here is how to do it:
We never added any scheduling functionality in File Synchronization because everything needed
is in Calendar. Here is how to do it:
Launch Calendar. Double-click in the day where you want the backup to occur. For the event title, type
something like Launch File Synchronization at 9pm:
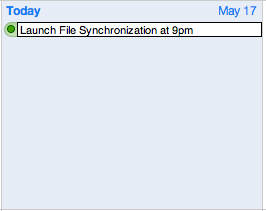
something like Launch File Synchronization at 9pm:
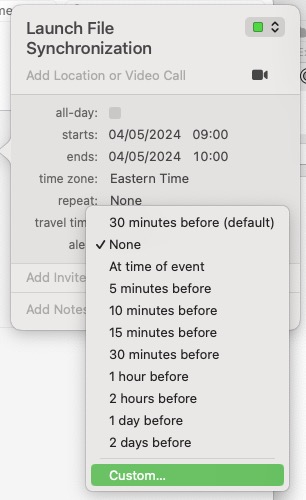
Change the alarm and choose Custom:
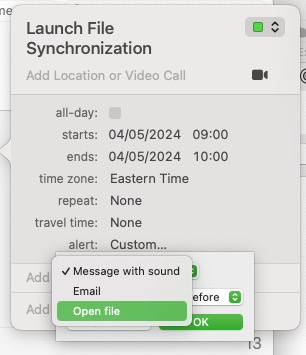
Select Open file:
Click the Calendar item that will appear and choose Other… (or File Synchronization if you already
opened it):

opened it):
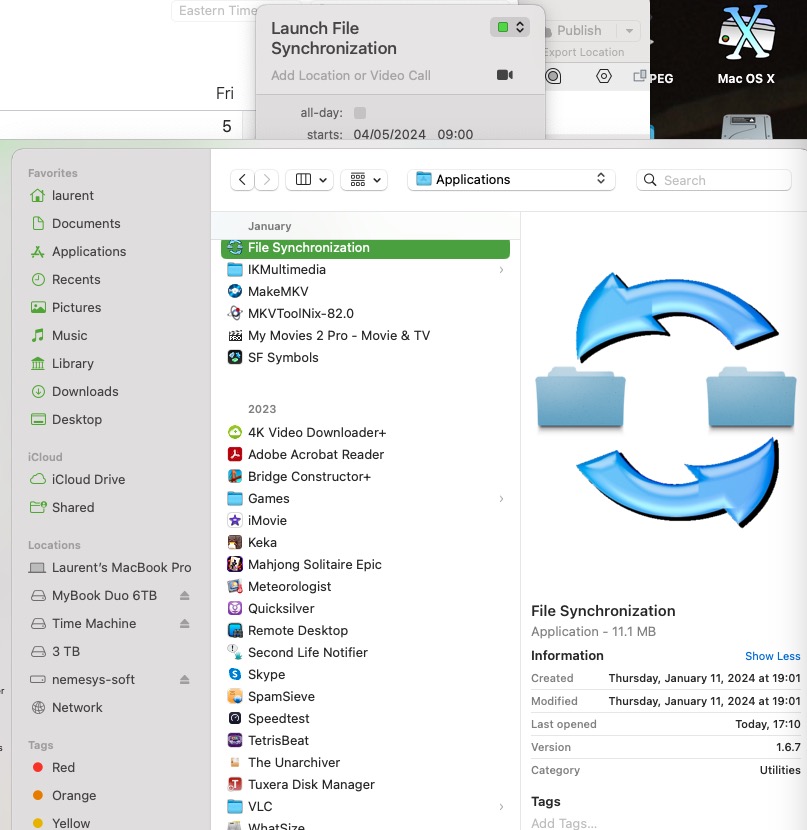
Select File Synchronization from the Applications folder:
Change the number of minutes File Synchronization will be launched. The event should look like this:

In File Synchronization, make sure that the application is set to sync at launch, through the main preferences (Sync Settings tab). If you want File Synchronization to quit after the sync, turn the appropriate checkbox on. Note that only pairs set for Automatic or Repeated syncs will be automatically synchronized at launch. If you ever need to change your settings in File Synchronization or do a manual sync, remember to hold on the space bar when you launch it otherwise, it will go in automatic mode.
Back to top
Back to top